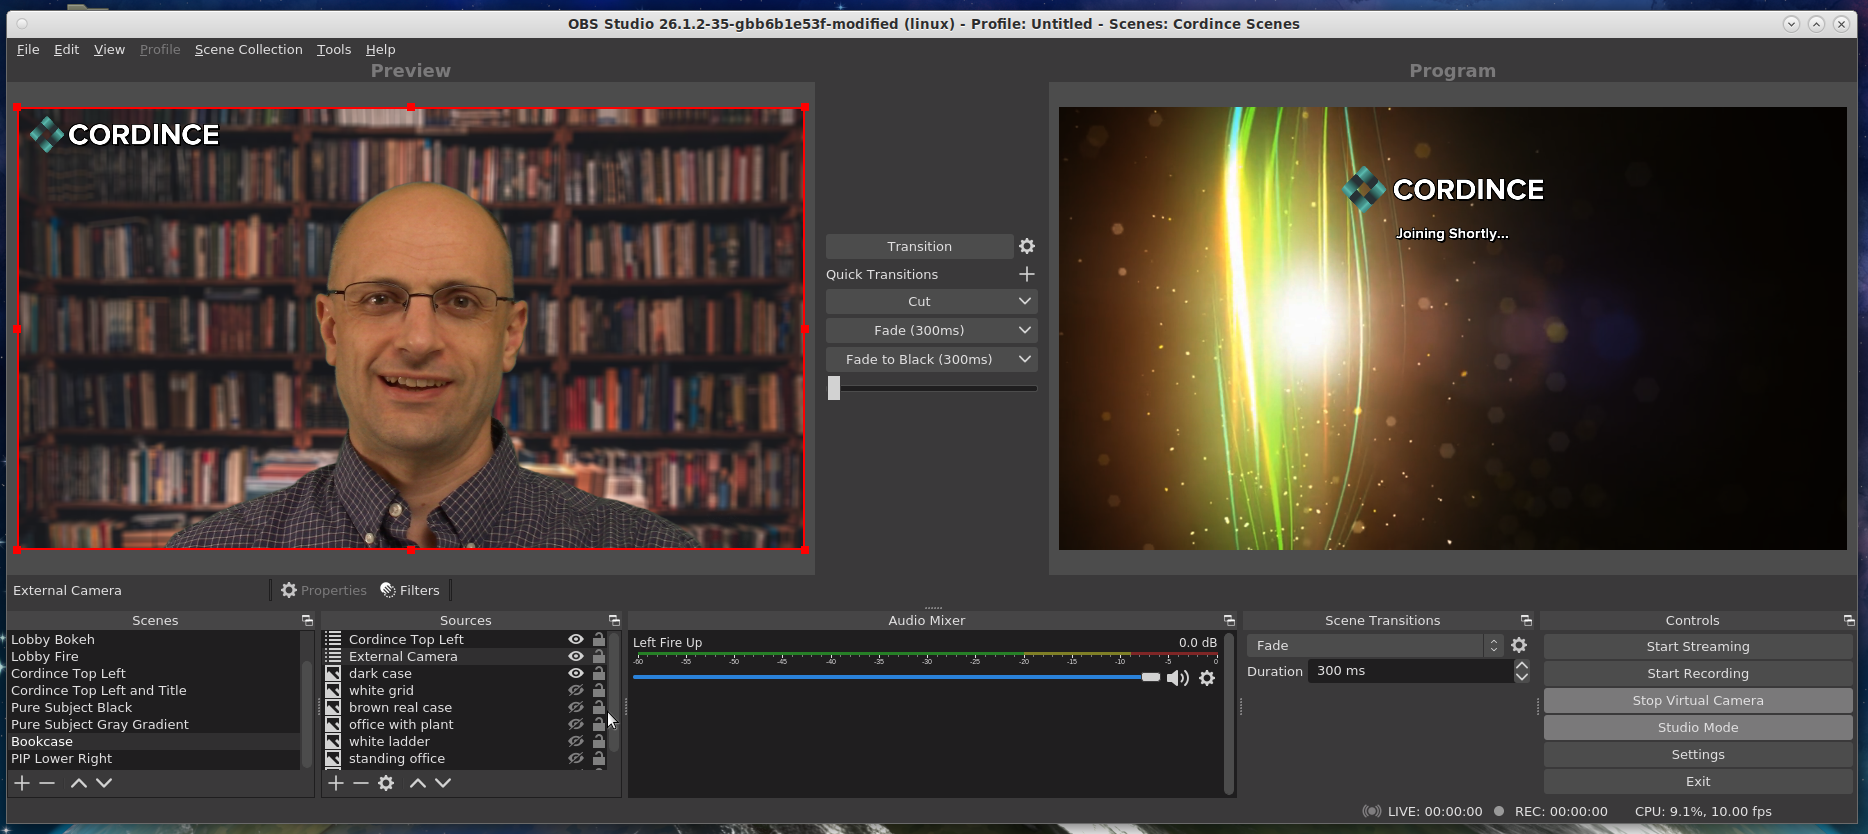
OBS Studio hardware and software configuration focused on a better videoconferencing experience.
The short answer is: get a ring light for your phone. This 20$ investment will make your videoconferences 80% better. Here's an example unit that worked fine with a 2020 era budget smart phone: https://www.amazon.com/gp/product/B075ZLCSGP/
Read on for the long answer on how to expand your videoconferencing setup to achieve many of the broadcast-studio effects.
Requirements: Space, lens, and light.
Space:
The remainder of this guide assumes that you have a room or a section in a room that is 8 feet long, 4 feet wide, and 9 feet tall. Every inch is required. Stand during the video conference or sit on a tall stool.
Lens:
The actual camera sensor megapixels is not important anymore. What is important is that you have camera with a mechanically movable lens, and a depth of field that is more shallow than the typical webcam. The key is to differentiate your appearance on screen from nearly all 'webcams'.
Light:
Two softboxes with LED's. They need to be positionable far from the camera, on their own tripods.
Everything below here is additional, if you do the above three you will differentiate your videoconference from 95% of other participants.
Hardware setup
Total cost
If you include the computer, monitor, everything: $1750 If you include just what was purchased new: $843
Computer.
This entire guide was developed on a 2013-era Lenovo laptop with an i5 at 1.6ghz. It works fine for videoconferencing. It gets hot, but it does work for hours on end with no issues. This computer cost 700$ in 2014.
Video Components.
$250 Canon VIXIA HF R800 setup.
Comes with all cables needed out of the box.
https://www.walmart.com/ip/Canon-VIXIA-HF-R800-Camcorder-Black/600185698?wmlspartner=wlpa&selectedSellerId=0

Settings changed from default:
Home->Display
  onscreen markers: level grey
  output onscreen markers: off
  demo mode: off

Zoom speed static, not dynamic.
Shooting mode: highlight priority.

$107 Elgato Cam Link 4K — Broadcast Live, Record via DSLR, Camcorder, USB 3.0
https://www.amazon.com/gp/product/B07K3FN5MR/

$140 Computer Monitor - the monitor used here is a 11 year old samsung
display. It's completely fine once the backlight warms up, again for
videoconferencing. Any newer full-hd display will be fine as long as it
has a vesa mount.
Audio Components.
Used in wired and wireless configuration:
$12 Greyghost Single Earbud, Earphone, 3.5mm Monaural Hollow Air Tube Wired Headphone
https://www.amazon.com/gp/product/B07F7SW7ZZ/

Optional Wireless components. These can be more trouble than they are
worth, but if you can make them worth it's an order of magnitude cheaper
than a 'pro-grade' wireless setup:
$65 Alvoxcon USB lavalier Mic System
https://www.amazon.com/gp/product/B08DV5NJJM/

$13 Clip-Type Bluetooth 4.2 Transmitter and Receiver -2-in-1 Wireless 3.5mm Adapter,
https://www.amazon.com/gp/product/B07YG13BPR/

Preferred wired setup. These components may not be necessary for your
configuration depending on the hardware that came with your computer.
This is a dead simple, low cost wired setup that is highly recommended
over fighting the wireless configs.
14$ USB sound card with mute button
https://www.amazon.com/gp/product/B08LPBW877

$6 USB 2.0 extension cord
https://www.amazon.com/gp/product/B001MSU1FS

$5 3.5mm extension cord
https://www.amazon.com/gp/product/B00RXNUXGS/
Furniture and Lighting
$168 DEVAISE Adjustable Height Standing Desk, 47 inch Sit to Stand Up Desk Workstaion with Crank Handle for Office Home, White
https://www.amazon.com/gp/product/B07QVLBNJH/

$30 11" Adjustable Heavy Duty Robust Magic Arm
https://www.amazon.com/gp/product/B07CTFZSXZ/
Note that this requires operator skill, but once you learn how to use it
it's exactly as the reviews describe.

150$ MOUNTDOG Photography Lighting Kit,6.6X 10ft Backdrop Stand System and 900W 6400K LED Bulbs Softbox and Umbrellas Continuous Lighting Kit for Photo Video Shooting,etc.
https://www.amazon.com/gp/product/B08FMGDTR1/

The umbrella lights are not required. The various stands can be
repurposed based on your existing hardware.

$40 Insignia monitor mount with arm:
https://www.bestbuy.com/site/insignia-monitor-mount-silver-and-black/4374500.p?skuId=4374500
Miscellaneous
$14 3 pack 1" inch x 60yd STIKK White Painters Tape 14 Day Easy Removal Trim Edge Finishing Decorative Marking Masking Tape (.94 IN 24MM)
https://www.amazon.com/gp/product/B07SFLPX1G/

$9 Pro Tapes Pocket Gaff Tape 1 inch (24mm) x 6 Yards Length Black Matte.
https://www.amazon.com/gp/product/B01EN7GZE0/

$14 Power strip

$13 Extension cord
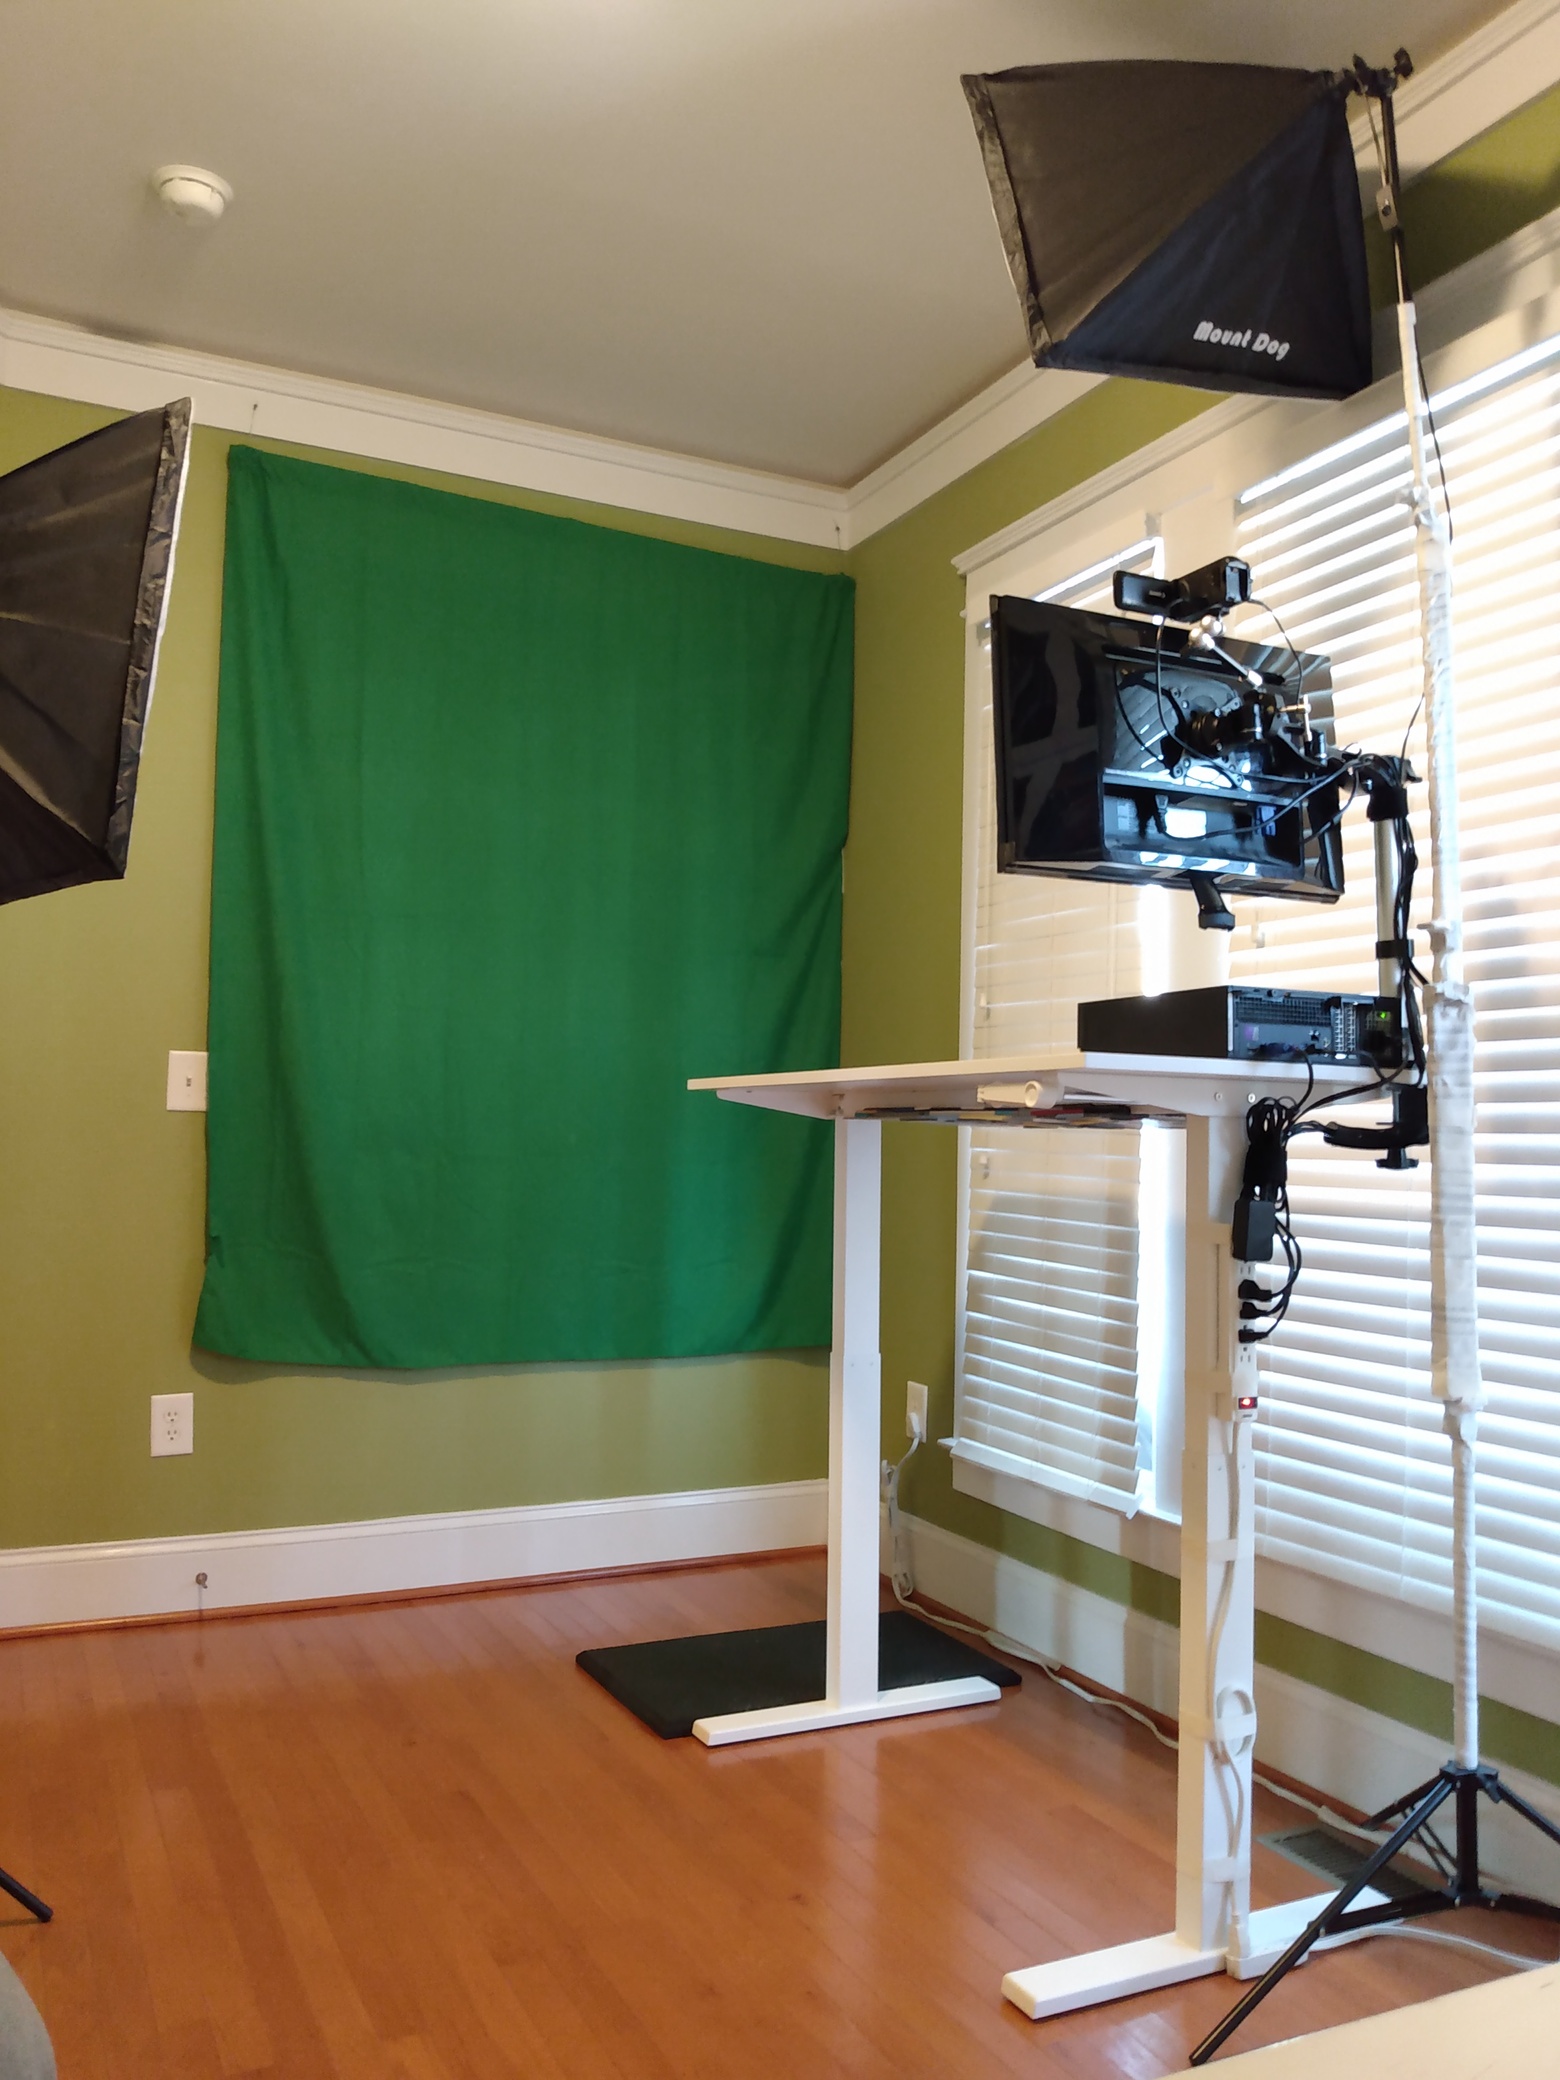
Physical setup of camera.
Turn the standing desk sideways, and mount the arm as far back as
possible. Mount the camera as far back as possible. Even the 3 or 4
inches more distance shown in the picture by mounting the arm on the
side of the table makes a big difference in the appearance of the image.

An added bonus of this setup is that at the distances used, a
teleprompter is not necessary. If you resize your teleconference window
to be tiny and move it towards the top of the screen, it looks to the
other participants like you are looking at them directly.
Physical setup of lights.
The primary light is mounted slightly offset from center, at 7.5 feet
tall. In the picture shown the black tripod is wrapped in white tape
which helps it blend into the background.

The secondary light is mounted at eye level and placed at a 90 degree
angle, approximately 6 feet away directly to the side of the subject. If
you don't have that much room, place it as close as you need it and turn
the power down.

More on the detailed lighting configuration below in 'Green screen'.
Green screen physical configuration
The key here to a easy and good green screen experience is to select the
'White' setting on the provided LED's. The LED's provided with the
MountDog lighting system are unlabelled. So the manufacturer is unknown.
The remote control they come with has three buttons, warm, cold and
white. The 'white' setting looks closest to daylight and makes the green
screen setup easiest.

The lights themselves come with an incredibly useful feature of clicking
on and off the light cycles through the color temperature modes, so you
won't need the remote, unless you want to adjust the power.

Physical green screen setup is possible on the provided tripods. It's
unstable even with a variety of workarounds, and will move
significantly. The best approach is to keep the top bar, and mount the
bar directly on the wall. You can use the clamps at the top to attach
the other color cloths, but in practice only the green cloth is
necessary. Wrinkles and waves make almost no difference and will be
smoothed out by the correct lighting configuration.
Audio setup
Wired setup:
This is the preferred mode, as wireless really isn't necessary for
almost all videoconferences. It also has a variety of issues that need
to be compensated for (see below).
All you 'must' have for this to work and look and sound better than 95%
of videoconferences is two 3.5mm extension cables.
Plug the microphone into one, then into your computer.
Plug the headphone earpiece into the other than into your computer.

Use the optional usb audio controller and extension cable to give
you more manueverability and a single microphone mute button.

Wireless setup:
Microphone: position the wireless usb dongle on a port where you can see
it. This allows you to reach down and push the 'power off' button on the
wireless portion, and you'll see the USB dongle lights turn off
indicating you're on mute.

Major issues: Using the combination of bluetooth transmitter for
listening and 900mhz to usb for microphone works 'sometimes'. On some
computers it works out of the box with zero issues. On others it will
have bluetooth pairing issues and when it does pair, cause incredible
audio and video delays. The workaround is just to use wired. In practice
noone will see the wires, and you won't be moving around that much
anyways.
Software setup
If you are on windows, install the most recent version of OBS studio,
then skip to the 'start obs' section below.

dnf install snapd
snap install obs-studio
If you get a message about 'too early/device not seeded', wait 3
seconds and try again.
snap connect obs-studio:alsa
snap connect obs-studio:audio-record
snap connect obs-studio:avahi-control
snap connect obs-studio:camera
snap connect obs-studio:jack1
snap connect obs-studio:kernel-module-observe

dnf copr enable sentry/v4l2loopback
dnf install v4l2ucp v4l2loopback

echo "options v4l2loopback devices=1 video_nr=13 card_label='OBS_Virtual_Camera' exclusive_caps=1" | sudo tee /etc/modprobe.d/v4l2loopback.conf
echo "v4l2loopback" | sudo tee /etc/modules-load.d/v4l2loopback.conf
modprobe -r v4l2loopback
modprobe v4l2loopback devices=1 video_nr=13 card_label='OBS_Virtual_Camera' exclusive_caps=1
reboot

Install the fonts from this repo:
https://github.com/Cordince/OBS-Studio-Setup
into:
/usr/share/fonts/proxima-nova-fonts.

Start obs.
When it starts for the first time, choose 'i will only be using the
virtual camera'.

Change the output settings to be HD (960x540), with a FPS of 10. This is
for video conferencing, so noone will be able to tell the difference and
produces much less load on your system.

At this point, you can clone this repo, and change the file locations
with a text editor.

Then import the scene collection into obs-studio, and everything should
be setup correctly. Continue on for details on how it was built. This
repo contains the scene collection:
https://github.com/Cordince/OBS-Studio-Setup
Computing system configuration
Optional, but enables fast power on to dedicated videoconferencing
system:

Install Fedora Core Mate 33 workstation.
Make sure to not encrypt the data.

After login, with network connected:
dnf -y update
hostnamectl set-hostname studio
systemctl enable sshd
systemctl start sshd
reboot

As root, edit /etc/lightdm/lightdm.conf
Under the 'Seat:' section, add the lines:
autologin-user=your_username
autologin-user-timeout=0

System -> Preferences -> Look and Feel
Set screensaver to not enable, do not lock when idle.

dnf install https://download1.rpmfusion.org/free/fedora/rpmfusion-free-release-$(rpm -E %fedora).noarch.rpm https://download1.rpmfusion.org/nonfree/fedora/rpmfusion-nonfree-release-$(rpm -E %fedora).noarch.rpm
dnf update -y
reboot

Set static ip address in network configuration

Change the startup config to auto start obs with virtualcamera enabled.
Add a startup of chrome, delayed 30 seconds so obs studio has time to
start.
Green screen OBS configuration
The settings described below are all included in the default
configuration OBS file here:
https://github.com/Cordince/OBS-Studio-Setup

Create a scene, call it External Camera.
Add a video capture source for the camlink device, name it camlink.
Choose 1920x1080 as the source resolution.
Click filters.
Add the chromakey.
If you're using the lighting setup described above, the default settings
are nearly perfect.  You may need to turn the similarity metric up
slightly. Use the arrow keys and nudge it up 1-3 levels as needed.

If you need to adjust for different lighting temperatures, choose
ChromaKey, then move off the screen. Select a custom color, then pick
from screen. Choose the green in the middle of the window behind where
the subject would be. Then adjust the similarity metric down.
Then add a color correction filter to bring back some of the color. The
results here are not as good as just using the 'white' color temperature
lights with default chromakey and no color correction.
Lobby videos
Use pexels and pixabay, and search for abstract patterns, geometrical,
and lobby videos, etc. Or just use the versions included in this repo:

Loading a 4k video will seriously slow down your system. You will not
need that resolution for videconferencing. HD resolution (960x540) works
fine and is indescernible from anything higher on most peoples phones
and computers.

If you have a lobby video that is larger than HD, scale it down with:
ffmpeg -i 4k_lobby.mp4 -filter:v scale=960:-1 hd_lobby.mp4

Matching color schemes can be performed by adjusting curves. Use ffplay
for previewing.
Make a video much bluer:
ffplay -i hd_lobby.mp4 -vf curves=blue='0.3/0.3 1/1'

Make a video de-saturated:
ffplay -i hd_lobby.mp4 -vf eq=brightness=0:saturation=0.8

When you are satisfied, replace ffplay with ffmpeg:
ffmpeg -i hd_lobby.mp4 -vf eq=brightness=0:saturation=0.8 hd_lobby_gray.mp4

Another alternative that works just as well is applying the filters in
OBS studio directly. Make sure you resize the videos first.
Work in Progress...
PIP Configuration
Studio Mode
Lower thirds animated displays
Lower thirds animated displays
Using phone as mute button, scene switcher.
BRB type scenes
With a single click it shows a 'brb' image or video, and mutes the audio
microphone.

Also a different setting that is 'video muted' where you can hear and be
heard but your camera is off for adjustments without it looking like you
are gone.
OBS integration of sound into the stream.
Try a phone as a secondary camera.
This is about giving a differentiated experience, and if you use NDI to
feed the camera image back into the presentation at a different angle
when you do different demos, talk about different things, share a
screen, etc. Or even if it just changes automatically and you shift your
eyeleline, that would be a huge differentiator.
Try shotgun mike mounted to camera or direct to computer.
Try level 2 configuration.
Level 1 is the self contained setup here. Level 2 is you go back to
wireless, then detach the entire monitor and camera stack and put it on
the other side of the room. Then you get the much further focal distance
setup in place. So it really looks like a studio, and you have your
laptop on the desk so you can see the conference, etc.
Try level 3 configuration.
Dolly moves of the camera. The ultimate version of this is simulating a
person behind the camera. Where it tracks the person and adjusts focus
and pan/tilt/zoom in a way that is much more organic than the auto-zoom
tracking systems. Something like piston translators on a rack that move
the camera, or actuators that move a tripod head, organically. And on
top that, the whole thing moves on a translation stage or a rolling
pedestal.